If you have not yet updated your blog to WordPress 3.3, try using the auto-updating feature first. But make sure you have performed a back-up of your blog. If time is limited, pay attention to backup these important elements:
a.) root directory .htaccess
b.) wp-config.php
c.) wp-content directory
d.) other important scripts in your blog (custom-made and not part of the WordPress core files).
e.) WordPress database
f.) robots.txt – if you are using this.
g.) wp-includes/languages –if your blog uses a language file.
The auto-updating feature in WordPress would safely bring your site to maintenance mode and update the core files to WordPress 3.3 quickly and easily.
Case#1: Auto-updating Fails
If auto-updating encounters an issue; then you can safely revert back to the previous version by following the procedures below:
1.) Login to your server root directory using FTP/SSH or your hosting control panel.
2.) Find the file named as (with dot before the file name):
.maintenance
3.) Delete this file to remove the maintenance mode message in your site.
4.) Clear your browser cache and history then your site should return back to normal.
5.) You can now login to your WordPress admin again but the core files are still not updated to use the latest version.
Aside from timeout issues (which you can safely click auto-update again when your server is not anymore busy); one of the common causes why auto-updating does not work is in relation to file permissions and owner settings in Apache server. To troubleshoot:
1.) Check if your WordPress directory and folders are using correct file permissions, some guide:
a.) wp-content, wp-admin, wp-includes is using 755.
b.) WordPress core PHP scripts (index.php, etc.) are using 644.
c.) Other wordpress folders such as “upgrade”, “themes”, “uploads”, “plugins”, etc. will be using 755.
2.) If any of the above items are not in the proper file permissions, try changing them to designated permissions. You can use Filezilla FTP client to do these changes. To do this, login to your server using Filezilla; right click in affected WordPress folders or scripts then click “File permissions”.
3.) Check if your WordPress directory is owned by you. To do this, login to your WordPress root directory and make sure all files and directories are owned by your assigned username (which you use when logging in FTP or SSH). See screenshot below:
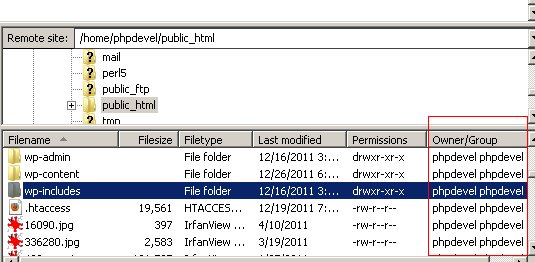
In the above example, the username assigned by the hosting company is “phpdevel” and the WordPress directory is owned by this username also. This is correct. The group can be owned also by you or another party but it’s the owner that is important. If the owner is not the same, you need to contact your hosting company.
3.) If all file permissions and ownerships are in place; try performing the auto-update again. It should be working fine.
If it still fails, delete .maintenance and you need to manually update WordPress core files. Read this guide on how to safely update WordPress core files manually.
Follow the steps in the first section: “Overview of the Upgrade Process” except that after “Step3. Verify the backups”; you need to bring your site to maintenance mode first by:
a.) Create a PHP script and named it as 503.php with the source code below:
<?php

header('HTTP/1.1 503 Service Temporarily Unavailable');

header('Status: 503 Service Temporarily Unavailable');

header('Retry-After: 10800');

header('X-Powered-By:'); ?>

<html>

<head>

<title>URGENT WEBSITE MAINTENANCE!</title>

</head>

<body>

<h1>Doing maintenance</h1>

<p>This site is under maintenance right now.</p>

<p>This should be ready again in under 3 hours.</p>

</body>

</html>
You can change the number of maintenance hours from 3 hours to any number of hours by converting the number of hours first to seconds and then replacing 10800 seconds in:
header('Retry-After: 10800');
b.) Open your current WordPress .htaccess and paste the code below starting on the first line of your .htaccess
RewriteEngine On

RewriteBase /
Allow blog admin to access the website normally
RewriteCond %{REMOTE_ADDR} !^91.210.196.8
RewriteCond %{REQUEST_URI} !^/503.php
RewriteRule .* 503.php [L]
Replace 91.210.196.8 with your own IP address which you can find here. This will let you login and access your WordPress site normally while other visitors (bots, etc.) to your blog will be provided with a 503 temporary not available status.
c.) Upload your .htaccess and 503.php to your WordPress root directory.
d.) Check if 503 server header status are now returned in your blog using this server header status checker.
If the homepage now returns 503 header status then proceed with deactivating the plug-ins and the rest of the manual updating process as stated in this guide.
To remove maintenance mode, simply delete 503.php in your WordPress root directory and remove the maintenance code in your .htaccess.
Special case to those that are still using PHP 4 and MySQL 4: As of WordPress 3.2, the minimum hosting requirements is changed to PHP 5 and MySQL 5. So if you are still using PHP 4 or MySQL 4, you need to upgrade them first before upgrading WordPress to use WordPress 3.3.
Case#2: Auto-update successful but Returning with Errors
In this case, you have succeeded updated your blog to WordPress 3.3 but the site runs unstable or returning a lot of errors. There are two possible causes for this:
1.) Plug-in related issues.
2.) Theme related issues.
The first thing to check is whether plug-in related issues exist. To troubleshoot, refer to the steps below:
1.) Put your website in maintenance mode (refer to previous section for guide).
2.) Disable all plug-ins first. If you cannot access to admin panel for some reasons, you can read some guide here.
3.) Enable the plug-ins one by one and check your blog for the presence of errors or blog instability. If you are using a caching plugin, enable it last because it can be difficult to check if other plugins are working with caching enabled. Remember all the configuration settings so that you can safely revert to it.
4.) Continue doing this until a certain plug-in returns with error. This is an incompatible plug-in with WordPress 3.3. Disable them back.
5.) Continue with the rest of the plug-ins until you have completed testing all of them.
6.) Finally enable the cache plugin with the settings you have been using before. If it returns an error; then the caching plugin you are using is not compatible with WordPress 3.3.
What to do with incompatible plug-in?
1.) Contact the plugin developer for updates and report that the plug-in is incompatible with WordPress 3.3. In some cases, you can go to the plugin page in WordPress to check if it’s compatible with version 3.3.
2.) If there is already an update available to sort out the incompatibility issues; update them before enabling them for use with WordPress 3.3.
3.) If there is no update available, you can either:
a.) Do not update to WordPress version 3.3 until the new version would be released.
b.) Remove the plug-in if the feature is not very important to your blog functionality and operation.
c.) Replace the plug-in with other compatible plug-in.
To troubleshoot for theme related incompatibilities. Follow the troubleshooting steps below:
1.) Put your site in maintenance mode.
2.) Login to your WordPress admin panel and change your WordPress theme to “Twenty Eleven”.
3.) Check whether those errors are gone by switching to Twenty Eleven.
If the errors are gone, then your theme is not compatible with WordPress 3.3 you have to report that to the theme developer and have it fixed. If for some reason you cannot login to your admin dashboard; you need to login to your WordPress website via FTP/SSH and then manually remove all themes (do not forget to back up your original theme files) except “Twenty Eleven”. This action would force WordPress to use Twenty Eleven.
Case#3: Theme errors due to overwritten WordPress core files
If you have edited your WordPress core scripts (which are not advisable) then updating to WordPress 3.3 can introduce errors because your changes will be overwritten.
To resolve this issue:
a.) Look for compatible plug-in that will replace the functionality removed by the update. Or edit only your theme files to add the features.
b.) Do not anymore edit the WordPress core files to prevent this issue from happening again in the future.
Finally for cases that are not mentioned in this post, you can refer to the quick FAQ in WordPress. Scroll down until you will see the “quick FAQ” section.
Hi All,
I am facing problem installing WP version 3.3 in Linux Web Host. The web host’s PHPMyAdmin interface clearly shows that it runs MYSQL version 5.0 (or slightly above version). I have checked this. But still i am getting this Error as below:
“You cannot install because WordPress 3.3 requires MySQL version 5.0 or higher. You are running version 4.0.27.”
Initially i thought there might be an error uploading WordPress core files so i deleted all and re-uploaded again but result is same as above.
Can any body helps me. Any suggestion..?
Best regards.
Hi,
I suggest you will get the MySQL version via a PHP script as illustrated in this tutorial: http://www.php-developer.org/php-script-to-display-php-version-and-mysql-version-of-your-website/
Put your MySQL database credentials (username, password, etc). Make sure these database credentials should be the one that will be used by WordPress.
Follow the procedure in the above tutorial. If it clearly shows that the database is now MySQL version 5, use that database credentials in your WordPress wp-config, this will be used by WordPress during updating, etc. If it shows this error again:
You cannot install because WordPress 3.3 requires MySQL version 5.0 or higher. You are running version 4.0.27
Contact your web host and if your web host confirms the database is really MySQL version 5. Contact WordPress support, probably a rare bug. I am not sure.